Monday, July 21, 2014
The Peculiar Particularity of Life
I have been giving a good deal of thought lately about the particularity of life. It must be a function of age, because one thinks of life in general terms (or at least I thought of life in general terms) when young. When we're young we can't help but observe the life ahead in the general terms of potential, not in the particular terms of what happened, when and where. I had a vision for myself, or as the American Idol aspirants would say, "a dream," but none of it really has come to pass. Thinking about it, I have a peculiar mixture of emotion, regret and resignation on the one hand, sufficiency and satisfaction on the other.
I would not have thought, for example, that I would have ended in Mountain Home, Idaho -- that I would have ended in this little house, with its small bathrooms, one of which has a cotton ball container, a repurposed candy dish that catches the afternoon light in a very particular way that is, such as it is, and beggars description. It is, quite literally, a transparent thing that has followed Lora and I in our lives, for how long? I do not remember it coming into our life, but I do remember it in the Chicago house, the Draper house, and now here in Mountain Home. How odd. Just this thing, following us, catching a certain slant of light on a summer afternoon, lifting the spirit with nostalgia.
I distract myself. I have my shop pretty much assembled in the new garage, but having that garage entirely to myself -- that is to say, my shop -- depends upon the shed. Lora has taken the camera with her to Michgan for the week, so I cannot post pictures, but I have nearly completed the framing for the foundation and floor. I used concrete pier blocks (aka hand blocks) partly because there is about an eight inch drop from one corner of the shed to the other, and the pier blocks seemed about the easiest way to create a level floor -- easiest conceptually. How it works out in particular is something else. Each block is about on cubic foot of concrete, and so it's, well, heavy. I must have lifted each of the fifteen two dozen times, attempting to get a perfectly square footing for the shed. My shoulders ache with the unaccustomed effort.
Instead of the standard joist arrangement, I made a modification. The top of each block has a center depression for a standard 4x4 post. Crossing that, it also has a depression for standard 2x lumber. Instead of a standard row of joists, I have opted for a torsion box frame for the flooring joists. It seemed the best way to maximize the pressure points of the pier blocks. I will probably regret that decision, but it provided supported joists running in all four directions. Today, I need to visit the lumber yard, and get the sheathing for the floor -- 3/4 OSB -- and some of the 2x4s that I will need to frame out the roof joists. Lora wants a hip roof on each end of the shed, so that will take some doing.
Friday, July 18, 2014
Beginning Again
Beginning Again
Beginning is the difficult part. Beginning again might be more difficult. After some shenanigans by the Board of Regents at Salt Lake Community College, where I had been serving as the Provost, I resigned in protest and have moved into retirement a year or two before I had anticipated doing so. It's not that Lora and I didn't anticipate the shenanigans. We have been through this loop before, and so put our home in Utah up for sale, sold it more quickly than we had anticipated, bought a place in Mountain Home, ID, and have pretty much moved into it. Last weekend, my son and I moved most of the furniture and most of my shop equipment out of storage in Utah to Idaho. The first couple of days were spent putting the house together, and the last couple of days putting my shop back together. Well, mostly back together. There's some residual stuff still in storage in Utah, and some of it important. I will fetch the residual back in a couple of weeks.
In Utah, the shop occupied a corner of the garage, and a corner of my life. With professional and other obligations, I found it virtually impossible to keep up with this blog. I do not have unlimited stores of energy, and the college sucked me dry. Today, Lora flies back to Michigan, with Bella, our granddaughter, to attend a wedding, and so I thought as good a day as any to begin again. She has been looking forward to it with mixed feelings. Her nephew is getting married, and this really may be the last time she is able to see her brothers and the extended family. Like most, however, her relationship with her family is fraught, and it is not my place to detail it here, but simply to suggest that her family would suffice to provide enough conflict, or drama, for a domestic novel or two or three.
Her trip leaves me with the dogs, the cat, and duh bunny. The bunny, uniquely named spot, is a recent addition from the D&B store, forever after the Duh Bunny store. It also leaves me with a couple of tasks. One is to replace the brick molding around the back door. That should take an hour or two. The other is to build a shed. That will take a bit more time. I look forward to the project, in part because it is the sort of thing that I would have been discouraged to take on in weekend bursts, in part because it is necessary to keep the garage free of storage and miscellaneous junk, and in part because it represents a new challenge -- something to keep my mind occupied. I hope to chronicle that, and other things, more openly, now that I do not have a public position to protect.
Peace and potatoes ...
Saturday, May 19, 2012
Binding


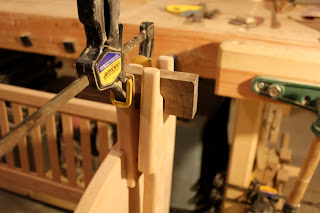
My solution goes something like this. Patience is a virtue, and one that I sometimes lack, but first, since I am cutting the channels with a rabbet bit and bearings, I should cut the channels for the purfling and the binding on the guitar body. I can then use the channel itself to cut and finish the binding material to thickness. I would still want it slightly proud of the channel to be scraped flush, but it would be considerably thinner, and the spring back after bending more amenable to adjustment with the tape's clamping pressure.
Sunday, May 13, 2012
Been Some Time

There are a couple of things I would do differently. First, there is order of precedence. I would glue up the back first. It seems a well-duh! moment, but it's difficult to clean up squeeze out through the sound hole. Second, I took the guitar out of the mold when I installed the end graft, and didn't put it back in. I have had an idea for some time now to leave the guitar in the mold, and use violin clamps to glue up the back. Once the shape has been determined, it can be removed from the mold to glue up the soundboard. Third, I need to make a bevy of violin clamps. It's possible to use various and sundry clamps, as I did, but the violin clamps would make it so much easier.

 The router is attached to a plexiglass base that is inserted in the slot that you can see in the drawer toward the bottom. It fits snugly for the moment, so I didn't put in a planned locking mechanism, but it would just be a set screw through a hardwood block above or below the slot.
In the photo at left, you can see the plexiglass base. It is shaped to avoid touching the guitar except at very specific locations on the top and sides. I use a rabbet bit, with a set of replaceable bearings. There are other ways to do it, but I had the bit, so might as well use it. I can get pretty close to the right depth, and I always make the binding a bit proud regardless, then scrape it down to final thickness after I've glued it up to the guitar.
The cradle is pretty straight forward as well. It's just cut to the shape of the guitar, with the rests that you can see pictured below.


Monday, April 9, 2012
Finished Cradle
As promised, here are some photos of the finished cradle. On the order of things I would do differently, if I had it all to do over again, I would extend the center of the basket to accommodate the hanger. I am not happy with the mechanism that I made up. It adds an element of fussiness to the design that wasn't necessary. I'm finishing it with Tung Oil. The cherry will darken over time, but in the meantime, it is au naturel in color. It now awaits my grandson.


Sunday, April 8, 2012
Cradle Progress
I have made some additional progress on the cradle. I have assembled the stand. The feet are a lamination of two pieces of Cherry. The vertical piece is attached to the feet with a through mortise. I cut the the mortise for the vertical piece prior to gluing it up, which simplified matters enormously. The stretcher is actually a lamination as well. I did not have a piece of sufficient width to run the required length, so I glued up two narrow pieces with a strip of walnut between. When I cut the decorative channel in the stretcher, I centered it on the walnut. If I had it to do over again, I might not cut the channel, but once cut, always cut.

The stretcher is also a through mortise. That I cut on the drill press with a 3/8th inch forstner bit, and cleaned it up with a chisel. You can see in the photo that it needs to be sanded flush, and cleaned up as well The two narrow pieces that I glued up for the stretcher were not the same width, so the walnut strip was not centered in the piece, but when I cut the tenon, I centered the walnut strip in the mortise. The walnut dowel pins are not necessary. The through mortise would have given more than enough strength for that joint, and so the pins are purely decorative.

The hanging assembly for the basket will fit in the half circle on the vertical piece (the head stock). You can see it in the photo below. The "hangers" will be cut from walnut scrap, and will be pinned in place with dowels, that will complement the dowel pins on the feet. I need to finish shaping the hangers, but they are a variant of "Molly's Cradle," the plans for which can be found with a quick web search. Personally, I like my idea better, but others may have a different opinion.
I hope to finish it today, and will post details on the "hangers" when I have them all together and cleaned up.

The stretcher is also a through mortise. That I cut on the drill press with a 3/8th inch forstner bit, and cleaned it up with a chisel. You can see in the photo that it needs to be sanded flush, and cleaned up as well The two narrow pieces that I glued up for the stretcher were not the same width, so the walnut strip was not centered in the piece, but when I cut the tenon, I centered the walnut strip in the mortise. The walnut dowel pins are not necessary. The through mortise would have given more than enough strength for that joint, and so the pins are purely decorative.

The hanging assembly for the basket will fit in the half circle on the vertical piece (the head stock). You can see it in the photo below. The "hangers" will be cut from walnut scrap, and will be pinned in place with dowels, that will complement the dowel pins on the feet. I need to finish shaping the hangers, but they are a variant of "Molly's Cradle," the plans for which can be found with a quick web search. Personally, I like my idea better, but others may have a different opinion.

I hope to finish it today, and will post details on the "hangers" when I have them all together and cleaned up.
Sunday, April 1, 2012
Progress on Cradle
I made a bit more progress on the cradle. I finished the slats on the other side and laminated the feet and rough shaped them.

I have partially shaped the spindles that will suspend the cradle, but I haven't quite decided yet what I want to do with them. You can see in the photo above, the through mortise that will will hold the rail. I'm going to laminate the rail from the cherry and some walnut. I also bought a walnut dowel to do the pinning, so the walnut should offset the cherry. It won't be as obvious as the cherry ages, but it will look sharp initially.

For reasons that ought to be obvious, I want the head of the spindle to look a bit like the headstock of a guitar. I am thinking of putting dowel pins along the "headstock" to suggest tuning pegs, but we'll see. It might be altogether too cute. At any rate, hope to finish it next weekend.
Subscribe to:
Posts (Atom)