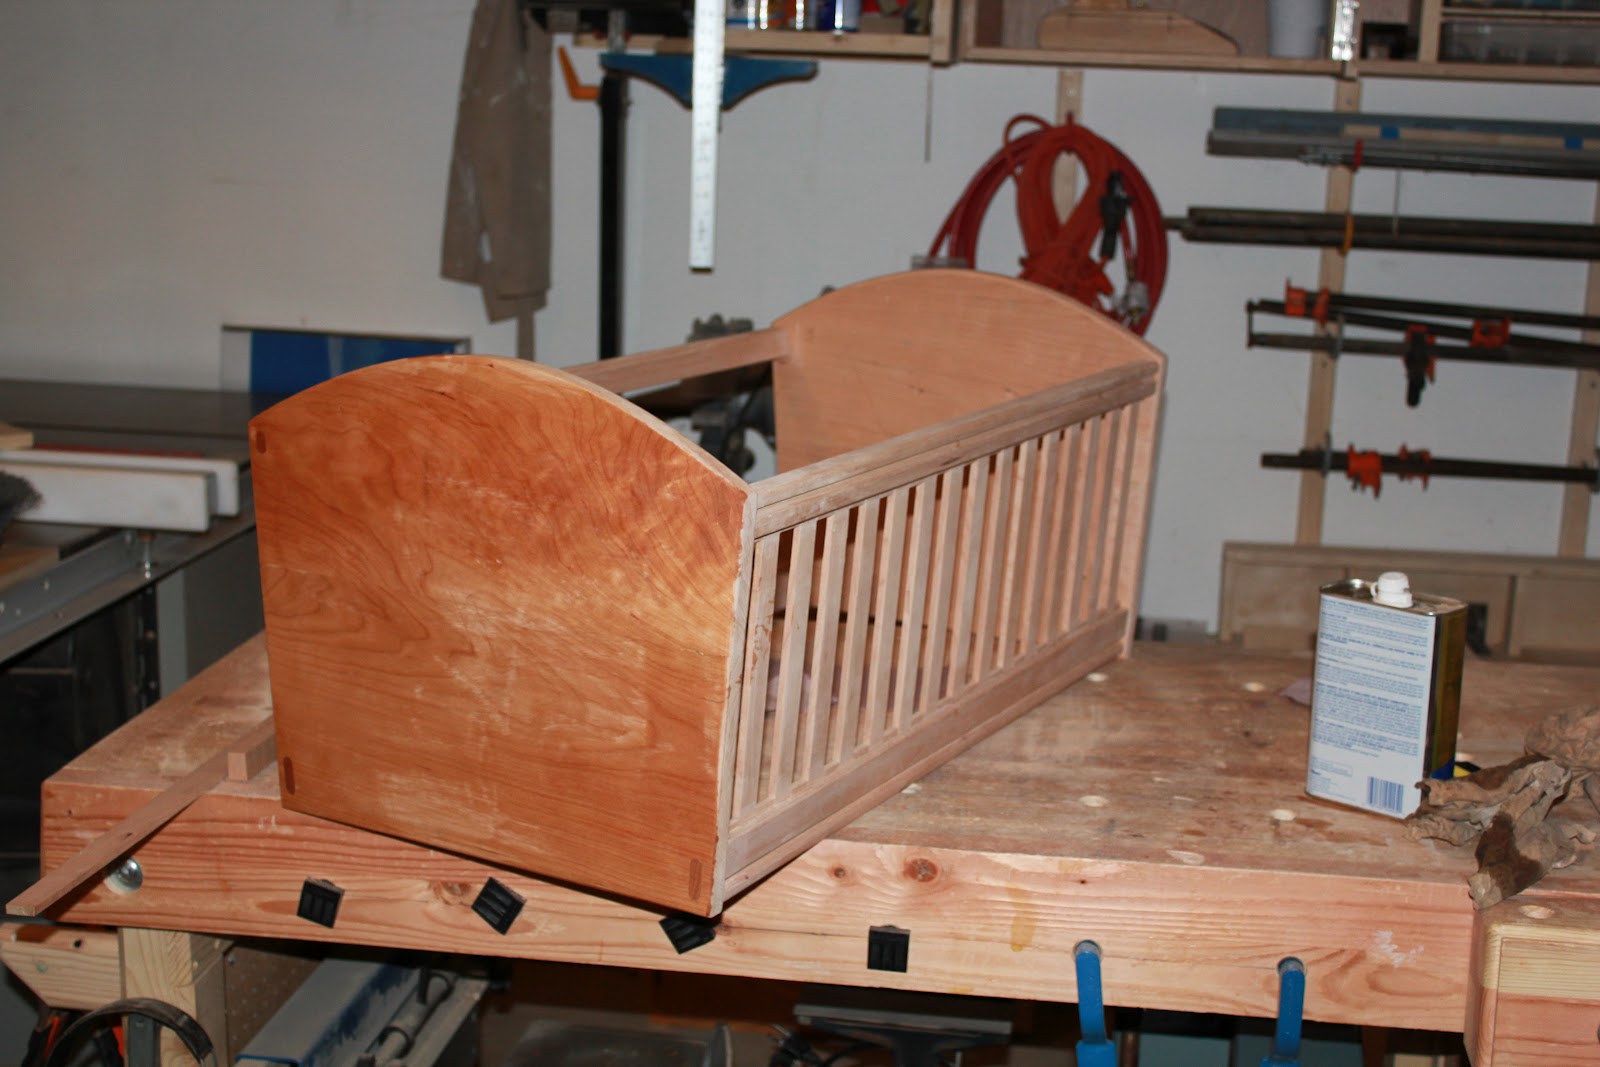
I made a bit more progress on the cradle. I finished the slats on the other side and laminated the feet and rough shaped them.
I have partially shaped the spindles that will suspend the cradle, but I
haven't quite decided yet what I want to do with them. You can see in the photo above, the through mortise that will will hold the rail. I'm going to laminate the rail from the cherry and some walnut. I also bought a walnut dowel to do the pinning, so the walnut should offset the cherry. It won't be as obvious as the cherry ages, but it will look sharp initially.
For reasons
that ought to be obvious, I want the head of the spindle to look a bit
like the headstock of a guitar. I am thinking of putting dowel pins along the "headstock" to suggest tuning pegs, but we'll see. It might be altogether too cute. At any rate, hope to finish it next weekend.
Sunday, April 1, 2012
Monday, March 26, 2012
Cradle
As promised, here is a photo of the cradle in progress that I promised for my new grandchild. I decided to make it from Cherry. I still haven't decided how I want to finish it. I would like to leave it alone. There is plenty of sun shine in LA where it will find its eventual home so it will darken with age naturally and that appeals to me, but since I'm making for my son and his wife, I should probably ask them.
As I mentioned the design is fairly simple. I wiped it with mineral spirits so you can see the through mortise and tenon joinery that attaches the rails to the end pieces. (Disregard the plane marks. I will sand them away, then finish it off it a card scraper for the sheen.) I cut the mortises on the drill press with a 3/8 inch forstner bit, and cleaned them up with a chisel. As you can see, I did not square the ends of the mortises, but rather rounded the ends of the tenons. That's more an aesthetic decision. I like the rounded ends.
I glued up the end pieces with the rails before installing the slats. I stood and stared at it for some time, then tried it with a dry fit, and it worked fine. The rails have a 1/4 inch groove cut along the length of the that hold the slats. The slats themselves were cut from scraps left from the rails and the end pieces. They should be slightly proud of the 1/4 inch, so one can plane away the saw marks, and adjust for a snug fit (though not too snug or they are difficult to fit into the groove). I put all the slats in place, then starting in the middle, I put 1 inch spacers between each slap, except at the ends, where a bit of adjustment on the length of the spacer was needed. The spacers between the slats stand about 1/8 inch proud of the groove, so they add a shadow line. The spacers themselves are glued in place, with a generous bead of glue along the bottom of each one. Since the slats are not structural, the hidden squeeze out from the spacers is enough to hold the slats in place. I will finish the other side with off cuts from the stand.
As I mentioned the design is fairly simple. I wiped it with mineral spirits so you can see the through mortise and tenon joinery that attaches the rails to the end pieces. (Disregard the plane marks. I will sand them away, then finish it off it a card scraper for the sheen.) I cut the mortises on the drill press with a 3/8 inch forstner bit, and cleaned them up with a chisel. As you can see, I did not square the ends of the mortises, but rather rounded the ends of the tenons. That's more an aesthetic decision. I like the rounded ends.
I glued up the end pieces with the rails before installing the slats. I stood and stared at it for some time, then tried it with a dry fit, and it worked fine. The rails have a 1/4 inch groove cut along the length of the that hold the slats. The slats themselves were cut from scraps left from the rails and the end pieces. They should be slightly proud of the 1/4 inch, so one can plane away the saw marks, and adjust for a snug fit (though not too snug or they are difficult to fit into the groove). I put all the slats in place, then starting in the middle, I put 1 inch spacers between each slap, except at the ends, where a bit of adjustment on the length of the spacer was needed. The spacers between the slats stand about 1/8 inch proud of the groove, so they add a shadow line. The spacers themselves are glued in place, with a generous bead of glue along the bottom of each one. Since the slats are not structural, the hidden squeeze out from the spacers is enough to hold the slats in place. I will finish the other side with off cuts from the stand.
Saturday, March 24, 2012
Kerfing & Cradle
I have made some progress on the guitar, but not as much as I would
hope. I traveled to Denver last week end to attend to family business,
but I have installed the kerfing. My jig for making the kerfing is
multi-purpose -- basically my cross cut sled for my table saw.
The saw sled has an auxiliary fence clamped to it with a brad nail driven into the bottom. You can see that the brad is about 1/4 inch from the saw kerf, and the depth of cut is set just shy of the 1/4 inch thickness of the kerfing strips. I cut the strips on my band saw (now working!) and run a plane over them to remove the saw marks. One set of two strips, for the back, is cut from walnut, the other set is cut from redwood, for the soundboard. For the first cut, I push the strip up against the brad, make the cut, adjust the depth and cut and run it over the blade again if necessary, then set the kerf over the brad, make the second cut, and so on. It's tedious, but it works.
When I've cut the strip, I run a plane over the back until it is paper thin, then do a test fit, cut it to length, and glue it into place with a whole bunch of spring clamps. When I glue it in place, I leave it slightly proud of the side, and level it down after the glue has dried. It looks like this when its finished. I'll do some additional leveling when I'm ready to install the back and sound board.

In the meantime, I have started on another project. My youngest son has commissioned me to make a cradle for my newest grandchild due in April. I've opted for a rather simple design, so I will let it emerge as I go along. Today, I succeeded in purchasing the wood (cherry) and gluing up the end pieces.
While the glue was drying, I cut the four rails for the sides, and the slats that will go into one of the sides. I have a trick for installing the slats. I cut a 1/4 inch slot with my dado blade along the length of the rails. The slats are set apart by spacers in the slot, so they are perfectly spaced, the spacers provide an attractive shadow line, and so all is good. Unfortunately, I came up a little short on the amount of wood I bought today, so I only have enough for one set of slats, for one side, but you can see rail design, and the slats. I hope to finish the ends, and one side tomorrow, so I'll have more pictures.
The saw sled has an auxiliary fence clamped to it with a brad nail driven into the bottom. You can see that the brad is about 1/4 inch from the saw kerf, and the depth of cut is set just shy of the 1/4 inch thickness of the kerfing strips. I cut the strips on my band saw (now working!) and run a plane over them to remove the saw marks. One set of two strips, for the back, is cut from walnut, the other set is cut from redwood, for the soundboard. For the first cut, I push the strip up against the brad, make the cut, adjust the depth and cut and run it over the blade again if necessary, then set the kerf over the brad, make the second cut, and so on. It's tedious, but it works.
In the meantime, I have started on another project. My youngest son has commissioned me to make a cradle for my newest grandchild due in April. I've opted for a rather simple design, so I will let it emerge as I go along. Today, I succeeded in purchasing the wood (cherry) and gluing up the end pieces.
Sunday, March 11, 2012
Side Bending
I have thicknessed and bent the sides for my guitar. There really is no way of describing the bending process in words. A person just has to do it to discover that it's not that difficult. The tools I use for bending are pictured at left.
The first step, however, is to mark the sides. I put them side by side, as a book-marked pair, and marked the waist bend on both. Do it with something that won't wash away as you soak the sides. Because I begin with the waist, and I would encourage people to do that, if it's marked you will avoid bending two left sides and the two ends will align with grain patterns.
The stainless tray was fashioned for me by students at the college, and it has come in very handy because it is side sized. I soak the sides to be bent in hot water and a cap full of Downy for about an hour or so before bending. The Downy, or any fabric softner, does just that, it softens the fibers so they bend more easily. The bending iron was a gift from my kids. I had an elaborate pipe and blowtorch set up before, but I would encourage purchasing the bending iron. I clamp it in my bench clamp, and let it heat up as the sides are soaking. When all is ready, then just bend. I wrap the bend in a wet cloth, press it against the iron, rocking it slightly, until I feel the fibers loosen and the bend taking shape. I use the clamping jig as a template, and when it is right, I clamp it into place to cool and set. I don't worry about a bit of spring back if the side can be clamped into the mold without excessive forcing. I then clamp it in the mold, and mark the centerline to cut off any excess from each end of the side.
You can see the sides in the mold in the photos to the left and right. Before gluing
up the sides, one needs to fashion the head and tail blocks. The tail
block is made from bass wood. Other woods could be used, but I like
bass wood, in part because it does not have a resonant overtone, and in
part because it is light in weight. The head block is made from
mahogony. Usually, I would use some left overs from the neck, glued up
into a block of the right size, but this particular block I purchased
from LMI. You can see the mortise for the neck tenon in the photo
below. I cut it in multiple passes on the router table with a 3/4 inch
straight bit. I will cut away the excess side material later clear the
mortise.
When I glue up the sides, I have the soundboard side flush with the top of the head and tail blocks. That keeps everything at the right angles, no pun intended. When the glue has dried, the next step is to arch the back. In the photo below, you can see the preliminary arch. I usually divide the guitar in half along the center line, and then plane along the side with my block plane, along each side, starting with short strokes near the block, then taking longer and longer strokes, until the side is planed flush with the block. When I have glued in the kerfing, I will take away some of the peak as I level the kerfing.
The first step, however, is to mark the sides. I put them side by side, as a book-marked pair, and marked the waist bend on both. Do it with something that won't wash away as you soak the sides. Because I begin with the waist, and I would encourage people to do that, if it's marked you will avoid bending two left sides and the two ends will align with grain patterns.
The stainless tray was fashioned for me by students at the college, and it has come in very handy because it is side sized. I soak the sides to be bent in hot water and a cap full of Downy for about an hour or so before bending. The Downy, or any fabric softner, does just that, it softens the fibers so they bend more easily. The bending iron was a gift from my kids. I had an elaborate pipe and blowtorch set up before, but I would encourage purchasing the bending iron. I clamp it in my bench clamp, and let it heat up as the sides are soaking. When all is ready, then just bend. I wrap the bend in a wet cloth, press it against the iron, rocking it slightly, until I feel the fibers loosen and the bend taking shape. I use the clamping jig as a template, and when it is right, I clamp it into place to cool and set. I don't worry about a bit of spring back if the side can be clamped into the mold without excessive forcing. I then clamp it in the mold, and mark the centerline to cut off any excess from each end of the side.
When I glue up the sides, I have the soundboard side flush with the top of the head and tail blocks. That keeps everything at the right angles, no pun intended. When the glue has dried, the next step is to arch the back. In the photo below, you can see the preliminary arch. I usually divide the guitar in half along the center line, and then plane along the side with my block plane, along each side, starting with short strokes near the block, then taking longer and longer strokes, until the side is planed flush with the block. When I have glued in the kerfing, I will take away some of the peak as I level the kerfing.
Labels:
guitar making,
guitar molds,
side bending
Sunday, March 4, 2012
Band Saw & Back Bracing
If I seem overly expressive, for lutherie work, the biggest and the best band saw you can buy is worth the investment. Why big? The impulse is to buy a smaller band saw -- a guitar sized band saw -- but that is a mistake. Because smaller band saws won't cut the plates for the back and sound board on a guitar. You need a saw with at least a 10 inch depth of cut, and able to accept a 3/4 inch blade -- at least. Although I love LMI, and I am always pleased with the quality of their products and their service, it's cheaper and more satisfying to start from scratch on all parts of the guitar.
Beyond that, I have done some work on the back of the guitar. There is an order of precedence to the back. One begins, of course, by bringing the bookmarked plates to thickness. I aim for a thickness between 3/32 or 1/8th inch. I joint the two plates. If there is no back strip, that is sufficient, but if there is a backstrip, I like to cut it at the same thickness as the back and glue it up. You can see it in the photo at right.
The strip itself is maple, and I ran a strip of B/W purfling along either side, just to set it off a bit. Because it is laminated, and not inlayed, it runs through the entire thickness of the back. A word of caution, this makes for a more fragile joint, so you will want to handle it carefully, until the reinforcement strip is glued in place.
The next step is the reinforcement strip. The best way to get the correct grain orientation is to cut a 1 inch wide strip off the bottom of the glued up soundboard. I used a piece of the redwood scrap, and cut mine from that. Because I didn't have my bandsaw, I had to cut it on the table saw and so it was cut thick.
Once I had glued it in place, I simply planed it down to a better thickness -- again about 1/8 inch. I glued it in place on the Go-Bar deck, using every go bar I could muster along its length. You can see the reinforcement strip in the photo at left. When I had the reinforcement strip in place, I traced the outline of the guitar on it the back, then cut out the rough outline using my jig saw. Normally I would use my band saw ... see what I mean.
The next step is the bracing. I used redwood for the bracing of the back. I had originally thought I would use the black walnut, but decided against it. I wanted a lighter bracing, and the redwood seemed to be the right path.
One does the bracing for the back in the same way that one does the bracing for the soundboard. I used a block plane to cut the rough radius on the bottom of the brace, then sandpaper on the radius dish to finish an exact fit.
The top two braces are 3/8th thick by 3/4 inches high, the bottom two braces are 7/16th inches thick and 1/2 inches high.
When the glue had set, I then carved the braces. I measured in two and a half inches from the inside edge of the guitar, marked the brace, and cut the scallop using a sharp chisel. When the scallop was done, I cut the top edge to a peak using my mini-plane. The final step will be the finish sanding.
Sunday, February 26, 2012
Back & Binding Jig
Last Sunday, I had some time, and the scrap left from my molds, so I began my binding jig. The construction is less complex than it looks. I began with the plastic that would serve as the router mount, and cut it to size. In the picture, the router is mounted backward, and I still have some work to do on the mounting plate, but it's width is correct and that was the crucial dimension.
Next, work on the interior box. On the material for the interior box (3/4 MDF) I cut the groove for the mounting plate on the table saw with a dado blade. It took a bit of fussing with shims to get the width of the groove correct, but I wanted a tight fit. Next, I cut the sides to width, about 2 1/2 inches, and length. The drawer glides determined the length. With the mounting plate in the side grooves, used that to get the measure for the width of the back. I used a simple butt joint, then glue and brads to build the box. You can use the mounting plate to keep things aligned.
The next step was the exterior box. Again, I cut the sides to width, about 2 1/2 inches. Again, the interior box and the drawer glides determined the height. It is set so the router, at the lowest level, will not bottom out its bit. A word on the base. You can see in the photo above and to the left, that it is flush with the front, but extends back. When the jig is in use, I plan to clamp it behind to one edge of my bench, and you can see from the photo that it supports the weight of my router without the clamps.
I built the exterior box in the same way. The width of back was determined by the interior box, with the drawer glides. I then used a simple butt joint with brads and glue. I cut and installed the base last. When the glue had dried, and I'd rounded over all the edges, I installed the drawer glides. Make sure you get the orientation right, but basically the interior box slides up and down like a drawer in and out.
Next, I need to fuss a bit with the router mount, and build the guitar cradle, but on the whole, this project went together better than I would have anticipated.
I had ordered the back and side plates from LMI. I was side tracked a bit. Originally, I had intended to use mahogany, but got side tracked by the idea of black walnut, a domestic wood. It arrived on Wednesday, so I was able to get a start on the back of the guitar.
I brought the thickness down some with my toothing plane, and my thickness sander. With the toothing plane, I only worked the interior surface. It's quicker than the thickness sander alone. There was a bit of tear out, but the thickness sander removed it along with the toothing plane tracks.
The center stripe is maple from the local hardwood store, with black/white perfling on either side. The stripe, as you can see from the back view goes all the way through, and is not an inlay. I prefer this to an inlay, particularly since the joint is reinforced. The assembly needs a little fussing to get it all lined up in the lattice jig, but then I don't need to worry about sanding through the inlay. I used scraps from the soundboard redwood to make the reinforcement strip. Once I had glued it in place on the on the go-bar deck (using every go-bar I had to insure even pressure along the length) I planed it level, then planed a slight bevel on either side, which is rounded over when I sand it. Today, I will work on the bracing for the back, which I intend to make from walnut, also purchased from the local hardwood store.
Next, work on the interior box. On the material for the interior box (3/4 MDF) I cut the groove for the mounting plate on the table saw with a dado blade. It took a bit of fussing with shims to get the width of the groove correct, but I wanted a tight fit. Next, I cut the sides to width, about 2 1/2 inches, and length. The drawer glides determined the length. With the mounting plate in the side grooves, used that to get the measure for the width of the back. I used a simple butt joint, then glue and brads to build the box. You can use the mounting plate to keep things aligned.
The next step was the exterior box. Again, I cut the sides to width, about 2 1/2 inches. Again, the interior box and the drawer glides determined the height. It is set so the router, at the lowest level, will not bottom out its bit. A word on the base. You can see in the photo above and to the left, that it is flush with the front, but extends back. When the jig is in use, I plan to clamp it behind to one edge of my bench, and you can see from the photo that it supports the weight of my router without the clamps.
Next, I need to fuss a bit with the router mount, and build the guitar cradle, but on the whole, this project went together better than I would have anticipated.
I had ordered the back and side plates from LMI. I was side tracked a bit. Originally, I had intended to use mahogany, but got side tracked by the idea of black walnut, a domestic wood. It arrived on Wednesday, so I was able to get a start on the back of the guitar.
I brought the thickness down some with my toothing plane, and my thickness sander. With the toothing plane, I only worked the interior surface. It's quicker than the thickness sander alone. There was a bit of tear out, but the thickness sander removed it along with the toothing plane tracks.
The center stripe is maple from the local hardwood store, with black/white perfling on either side. The stripe, as you can see from the back view goes all the way through, and is not an inlay. I prefer this to an inlay, particularly since the joint is reinforced. The assembly needs a little fussing to get it all lined up in the lattice jig, but then I don't need to worry about sanding through the inlay. I used scraps from the soundboard redwood to make the reinforcement strip. Once I had glued it in place on the on the go-bar deck (using every go-bar I had to insure even pressure along the length) I planed it level, then planed a slight bevel on either side, which is rounded over when I sand it. Today, I will work on the bracing for the back, which I intend to make from walnut, also purchased from the local hardwood store.
Labels:
back plates,
go bar deck,
guitar,
guitar making,
jointing,
luthier,
thickness sanding
Monday, February 20, 2012
A Bit More Progress
Another bad weather day -- about a foot of snow, but I was able to make a bit more progress. In the photo at left, you can see the bending mold, now on a stand with the clamps installed. I made them from scrap oak, but just about any wood will do. The clamp at the waist has been contoured on the bottom to fit the waist snugly. I did this on the bench sander, just rocking it back and forth, and checking it against the mold until it was about right. Although it is not visible, the far post passes through a slot, not simply a hole. When I had drilled the holes for the posts, I simply cut down with a gents saw into the hole. This allows one to position it more quickly, a necessity if you are using the Sloan method of bending -- essentially boiling the sides until they are pliable, and clamping them into a bending mold like the above. I have cracked several sides attempting it, and wouldn't recommend it, but then again Sloan has built more guitars than I will likely ever build.
In the photo at right, you can see the completed mold. I decided against the strap clamp for a couple of reasons. First, they were too stretchy. As I would tighten the extenders, it opened up the mold. Second, the arrangement visible in the photos gave the mold greater stiffness. Basically, it is simply a piece of 1/2 birch ply, tacked and glued on one side, bolted on the other with a 3/8th inch bolt. Perhaps not the most aesthetically pleasing arrangement, but it works like a champ.
You can see the extenders below. It is a simple arrangement as well, and a number of luthiers use something similar. Essentially, it is a 3/8th by 16 threaded rod inserted into a 1/2 steel tube. Both are available at the local hardware store. At either end, the rod and the tube are epoxied into the blocks. When the wing nut is tightened against the steel tube, it extends and puts pressure against the side in the mold.
To make them, I laminated three scraps of 3/4 MDF, and from that cut six blocks to size. Using the mold, I marked the contour on each block, and again shaped them on the bench sander to match the contour of the mold. I then drilled the 3/8 inch hole on one side, the 1/2 inch hole on the other, about 2/3 of the way through the block.
I then epoxied the steel rod into the 1/2 hole, and cut it off at about the center line of the mold, or where the two halves of the mold come together. Since the holes were not precisely to the same depth, this worked well, and kept a sense of symmetry.
For the threaded rods, I did the same. I epoxied one end into the block, then marked it at about one inch in from the opposite block. In other words, the rod extends into the tube to about one inch in from the tube-side block. This allows for enough rod in the tube to keep it straight, but also enough in and out play to remove the extenders when the kerfing has been installed on the side.
The contoured end of the blocks were covered with cork. The inside contour of the mold was also covered with cork. It not only makes it all prettier, but smooths out some of the differences between the three layers of the mold and provides a protective cushion. It's probably not necessary, but I do it regardless. The cork comes in a roll and can be purchased in places like hobby lobby. I cut the strips over-sized by about 1/4 inch. Although the cork came with an adhesive, I still sprayed the interior of the mold with contact cement, waited for that to dry, and installed it carefully. I then trimmed the excess away with a sharp exacto knife, and rounded it over with a file.
In the photo at right, you can see the completed mold. I decided against the strap clamp for a couple of reasons. First, they were too stretchy. As I would tighten the extenders, it opened up the mold. Second, the arrangement visible in the photos gave the mold greater stiffness. Basically, it is simply a piece of 1/2 birch ply, tacked and glued on one side, bolted on the other with a 3/8th inch bolt. Perhaps not the most aesthetically pleasing arrangement, but it works like a champ.
You can see the extenders below. It is a simple arrangement as well, and a number of luthiers use something similar. Essentially, it is a 3/8th by 16 threaded rod inserted into a 1/2 steel tube. Both are available at the local hardware store. At either end, the rod and the tube are epoxied into the blocks. When the wing nut is tightened against the steel tube, it extends and puts pressure against the side in the mold.
To make them, I laminated three scraps of 3/4 MDF, and from that cut six blocks to size. Using the mold, I marked the contour on each block, and again shaped them on the bench sander to match the contour of the mold. I then drilled the 3/8 inch hole on one side, the 1/2 inch hole on the other, about 2/3 of the way through the block.
I then epoxied the steel rod into the 1/2 hole, and cut it off at about the center line of the mold, or where the two halves of the mold come together. Since the holes were not precisely to the same depth, this worked well, and kept a sense of symmetry.
For the threaded rods, I did the same. I epoxied one end into the block, then marked it at about one inch in from the opposite block. In other words, the rod extends into the tube to about one inch in from the tube-side block. This allows for enough rod in the tube to keep it straight, but also enough in and out play to remove the extenders when the kerfing has been installed on the side.
The contoured end of the blocks were covered with cork. The inside contour of the mold was also covered with cork. It not only makes it all prettier, but smooths out some of the differences between the three layers of the mold and provides a protective cushion. It's probably not necessary, but I do it regardless. The cork comes in a roll and can be purchased in places like hobby lobby. I cut the strips over-sized by about 1/4 inch. Although the cork came with an adhesive, I still sprayed the interior of the mold with contact cement, waited for that to dry, and installed it carefully. I then trimmed the excess away with a sharp exacto knife, and rounded it over with a file.
Labels:
bending jig,
guitar,
guitar making,
guitar molds,
woodworking
Subscribe to:
Posts (Atom)