Saturday, November 19, 2011

Thickness Sander Continued


The pieces of the platen are pictured. I'll begin this morning by gluing the edge pieces up to the platen, and while that dries, I'll begin work on the base. I have a 2/6 piece of construction lumber that will serve as the base. It's been in my shop for a while, so it should be about as stable as possible for the humidity of the area. Today, I'll prep the lumber -- cut off the factory rounded edges, and run it through my thickness planer until I get clean surfaces -- and cut everything to length.

The assembly will be rather straight forward. There will be two sides, which hold the bearings, and two cross members. I will use half lap joints for the cross members, gluing and screwing them into place. At the front of the sander, where the platen is hinged to tilt up to the drum, I want to have a cross member, butt jointed into place with screws. I want to set it so the hinged platen is about 1.5 inches from the drum when it is fully flat. That should leave enough clearance for other sorts of projects, beyond the guitar (my wife has her eye set on "tea-boxes" that could be sold at the open market this coming summer). In the back, set at the same height, will be another cross member, through which the height adjustment screw will be threaded. The width of my table saw will determine the length of the base -- approximately 30 inches -- which will leave sufficient over-hang for the operation of the adjustment screw. The width of the platen will determine the width of the base. I'll make adjustments as necessary.

The object is to keep the construction as simple as possible. I had in mind another "sliding" method of adjusting the platen, but gave up on it for the sake of simplicity.

Thursday, November 17, 2011

Thickness Sander Continued

As I've said in an earlier post, there is an order of precedence in the building of a guitar. It isn't minutely exact, but from my perspective at least, it is exact enough. It begins with the sound board then moves to the back plate. For the sound board, there are essentially five steps (1) re-sawing the plate to an approximate thickness, (2) edge gluing, (3) refining the thickness, (4) installing the rosette, and (5) gluing on and shaping the ribs.

Re-sawing is a common woodworking operation, so I won't comment at length here. Besides, I think, most buy their plates from LMI or others at the approximate thickness. I do have some redwood, however, that I rescued from the lumber yard that I want to use for plates. Someone must have recognized it as special and pulled it from a decking pile. The grain is close, tight, and the board rings when tapped with a knuckle. I have cut several plates from it, and I plan to use a set soon.

The drum sander is used at step two, refining the thickness. I have used planes and sanding planes in the past. They work well, of course, but planes have their limitations on highly figured wood, and sanding planes are, well, tedious. I prefer to relegate them to the job of finish sanding, working up through the intermediate grits, then finishing with a sanding block on the fine grits. I have made the drum wide enough to accept the full width of the guitar, so I can edge glue the book-marked plates before refining the thickness.

The next step in the construction of the drum sander itself will be the adjustable platen. It should be relatively simple. I see it as a 20x30 laminated piece of 3/4 MDF and 1/4 hardboard, the latter replaceable if damaged. The design consideration was this: the drum itself is 20 inches wide, and my table saw is 30 inches wide. Since I envision the drum being turned by my table saw motor, that seemed appropriate. I will run a rib along the 30 inch side of the platen at about 2.5 inches thick, this to insure the MDF remains flat along its length, with a notch cut where the bolts secure the drum to the arbor. Since my wife will be in Boise this evening, fetching our grand daughter for the holidays, I hope to stop at the Depot or Lowes on the way home and get what I need to make the platen.

Wednesday, November 16, 2011

Thickness Sander


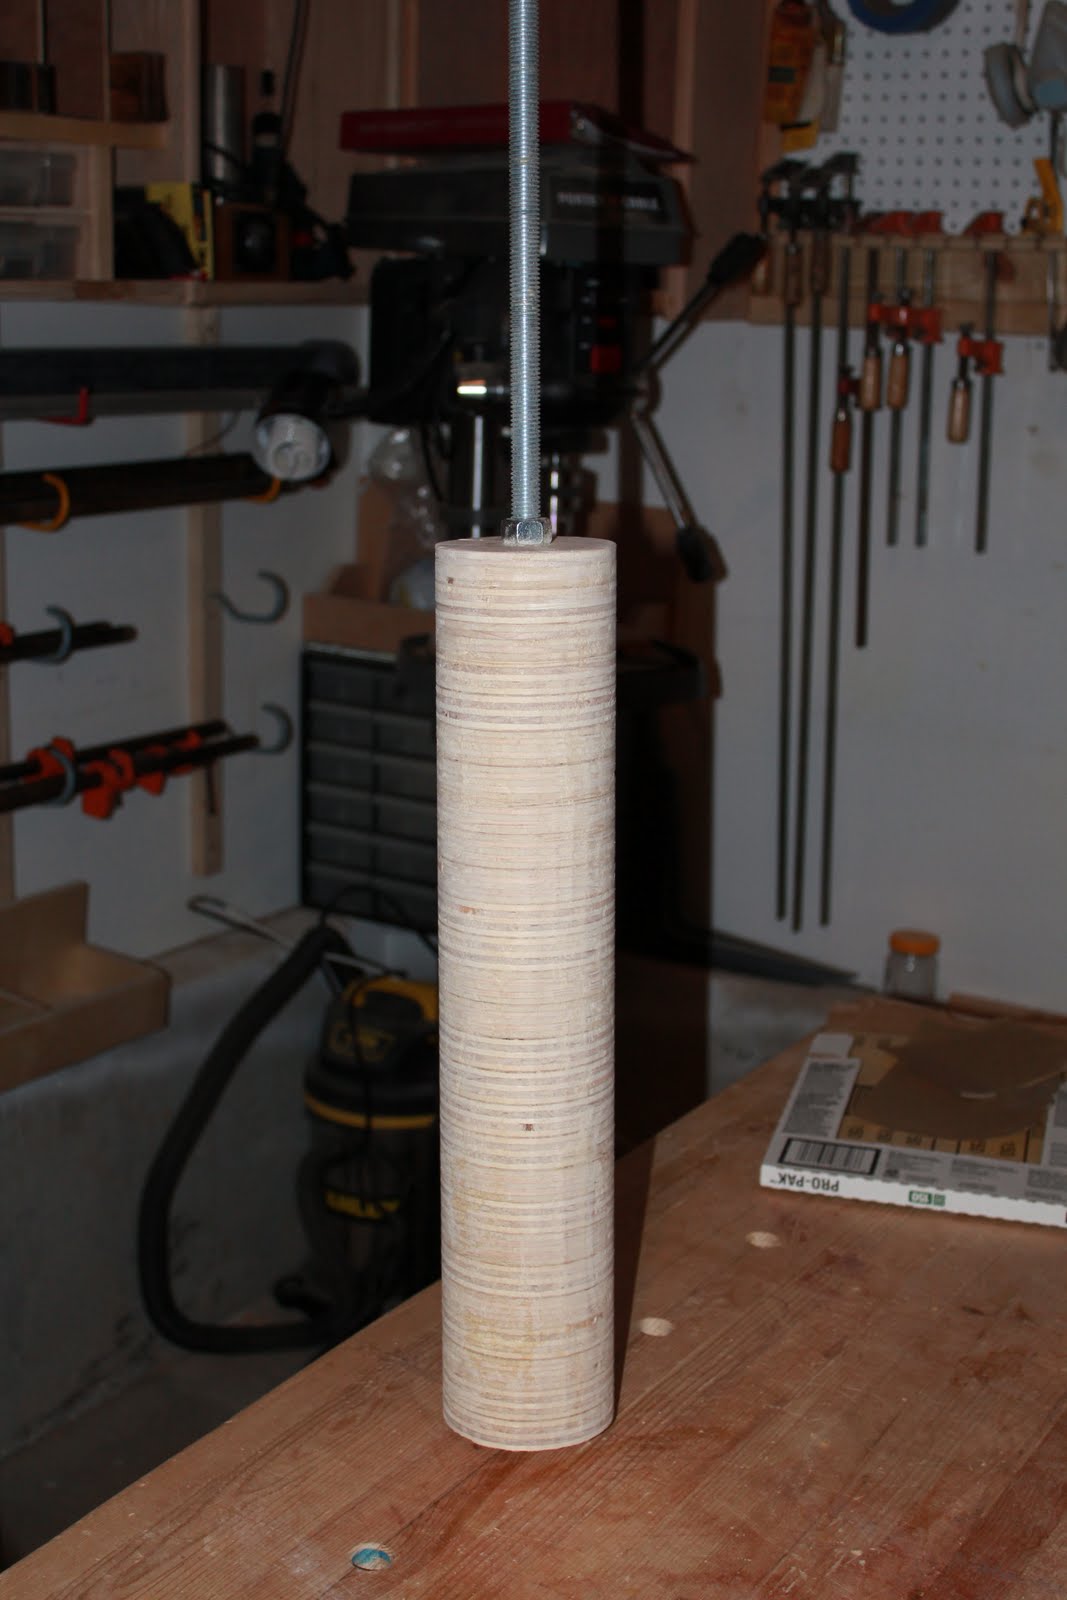
I have begun work on the thickness sander. Actually, I had begun work a couple of weeks ago on the drum. It began as scraps of birch ply (left over from the apothecary cabinet and the shop cabinets you see hanging in the background) cut to 4x4. I drilled the 5/8th inch hole for the arbor in the center of each and glued them up on the arbor in three sections, then glued up the three sections. MDF would, perhaps, have been better, and if I were buying the materials specifically for the sander, I would have gone with MDF, but the ply, I think, will do and eliminated a number of scraps that would have otherwise cluttered my shop. Once glued up, I then nipped the corners off the squares, as close to the finished diameter as possible, then set up my router lathe.

It too was made from scraps around my shop and consisted of two end pieces, slightly wider than the widest spot on the now octagonal drum. I drilled a 5/8 inch hole about an inch down centered on the end pieces to support the arbor. For the sides of the lathe, I ran a quarter inch groove along the length, then screwed the sides to the end pieces so the groove was about a quarter inch above the drum. I then made a base for my router out of quarter inch hardboard, sized to slide in the two grooves, then rounded over the drum by sliding the router back and forth in the groove as I turned the drum beneath it. The process is a bit tedious, in part because you don't want to crank the router down and take too big a bite, and would perhaps have gone more quickly had I cut circles instead of squares, but my bandsaw is still out of commission from the flood in Chicago. I received the motor, but it did not come, as I had anticipated, with the mounting plate, so now I am awaiting that. Altogether an exercise in patience.

Monday, November 14, 2011

Apothecary Cabinet & Bench


I have finished two new projects for my wife, the apothecary cabinet and a bench to match the dining room table. Both were accomplished with more or less standard woodworking techniques.

On the apothecary cabinet, I built the carcass, then fit the drawers and doors to the cabinet. The cabinet was slightly out of square, so that required some fiddling, but it came together adequate for my wife's purpose -- having many drawers to store the sorts of things that one can't find when one needs them, everything from batteries to dog brushes. Since it was a utility cabinet, I made it from the cheapest materials possible, standard construction grade white pine. The multi-colored finish was my wife's contribution.


On the bench, it is basic mission style, with perhaps the exception of the through tenon on the stretcher. It is a compromise between mission style chairs and a dining room table with a trestle base, which has a similar through tenon (intended to imitate a Japanese joinery technique.

Sunday, October 16, 2011

Order of Precedence

There is an order of precedence in building a guitar. For me, it begins with the soundboard, goes to the back, then the sides, all of which come together into the body of the guitar. Then comes the neck, the fretboard, the saddle, and the set up. I will go through all the steps in order, but the first is the soundboard. I have some plates that have survived the flood so I will not need to re-saw additional plates, and I use a rather traditional method of joining the plates, but in the meantime there are are several things that should be done first. I will need, in order, templates for the guitar, a shooting jig, a work-board, and a thickness sander. I laid out the templates yesterday on 0.25 hardboard, and will cut them out today. Progress was hampered a bit as my wife and I painted an apothecary cabinet that I had built for her, and I didn't want dust to contaminate and pock the finish. It should go into the house today, and so my goal is to cut out the templates -- not a particularly ambitious goal, but a goal.

In the meantime, I had ordered and several of the parts for the thickness sander have arrived -- two pullies (one three inch, one two inch), two pillow bearings, and a 5/8-11 threaded rod. It is the beginning of the thickness sander. The plan is relatively simple -- a bed, hinged to a frame, that rises against a spinning drum. The 5/8-11 threaded rod will be the arbor for the drum, the larger pully will be attached to the arbor, the smaller to the arbor of my table saw, which will supply the power. The idea of using the table saw is not my own. It originates with Shop Notes. My design, however, is much simpler. There is virtue in simplicity, so long as it works.

Saturday, October 15, 2011

The Great Flood


I have, or had, all the tools to build guitars. I say had because we have recently moved from Lombard, IL, a suburb of Chicago, to Draper, UT, a suburb of Salt Lake City. The move itself was not a happy one. It was motivated by the loss of my job and set in motion by a flood. It put our house, and my shop, under about six foot of water, and left chaos as it ebbed. I was able to salvage many of the tools, but not all. The motors on my table saw and band saw seized solid with rust. I've replaced the motor on the table saw, and with patience, and plenty of WD40 and wet-dry sandpaper, I've brought it back almost to new. The same with the band saw, with the exception that, as I write, the motor is on back order. All of the templates, jigs, and molds, however, were lost. In effect, I am starting from scratch, and will approach my path to the perfect guitar with a beginner's mind.

Sunday, October 9, 2011

Perfect Guitar

I have resolved recently to build a perfect guitar. It's silly, really, when you think about it, but I try not to think about it too much (I already think about too many things too much). I doubt, of course, that I will bring my resolve to any resolution. Perfection is an elusive standard, particularly when there is likely to be no consensus up front on just what would count as perfection. No matter, it is my resolve, and it is what it is, and one must begin any journey with a bit of faith that the destination is out there to be reached.